Animation Maker 1.4
July 4, 2021 Leave a comment
I’ve done a few tweaks to make it compatible with Nuke 13 and below.
Download it here or find it on Nukepedia.
VFX tips and tools for Nuke
July 4, 2021 Leave a comment
I’ve done a few tweaks to make it compatible with Nuke 13 and below.
Download it here or find it on Nukepedia.
January 6, 2020 1 Comment
Let’s say you want to make some code to create several nodes and link them up in certain positions relative to each other. Instead of writing all that Python by hand with x and y offsets and working out how to set various knob parameters, just let this tool I made do the work for you.
For example, you want the user to import a scan, along with a matchmove camera, some reformats, lens distortion, all the relavant geo, quicktime references etc… You could do that by making a template .nk and swap out all the bits at import time, but often it’s easier to generate it all on the fly with Python, and that can sometimes be a laborious trial and error to get it looking nice. This lets you design it in Nuke, but generate it on the fly.
If you need nodes dynamically generated, just put in one example node, run this tool, then replace that section with your dynamic code. For Groups it puts a placeholder node for you to replace with your own code because you might have put a custom tool there.
Note: this isn’t meant to be a foolproof tool for all occasions, but it should be enough to do most of the donkey-work, then you can refine the results. There’s a few things it misses, but I will try to iron out those quirks in later versions.
Add to menu.py like this:
import nodes_to_python
nuke.menu('Nuke').addCommand("Python/Nodes to python...", "nuke.display('nodes_to_python.create_python()', nuke.root(), 'Selected nodes as Python',1000)")
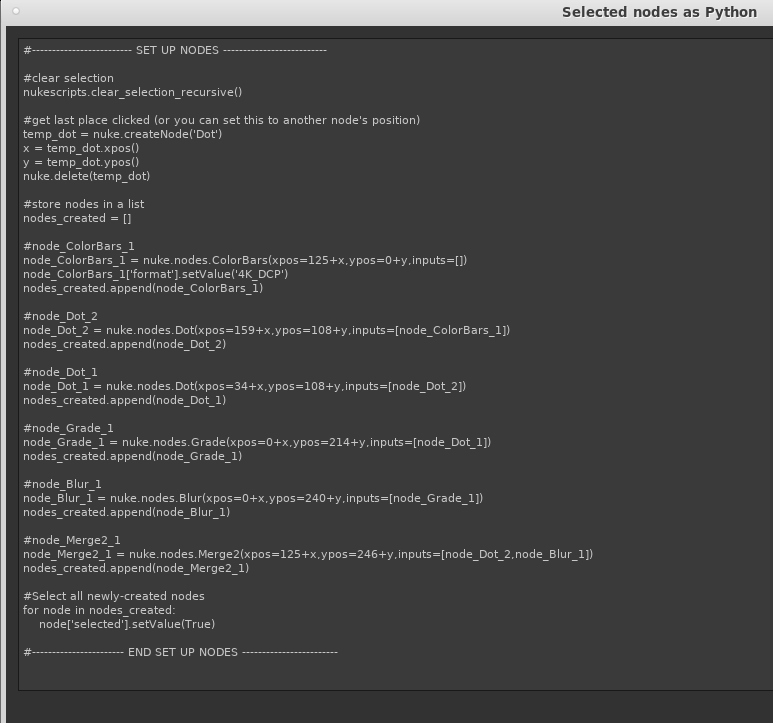
It puts the result into a Nuke text display window so you can copy/paste the results easily.
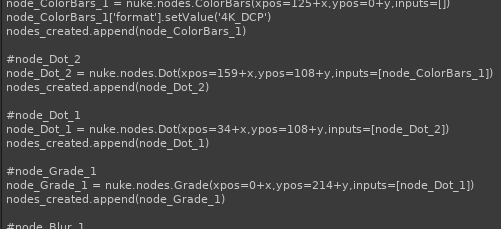
Example set of nodes:
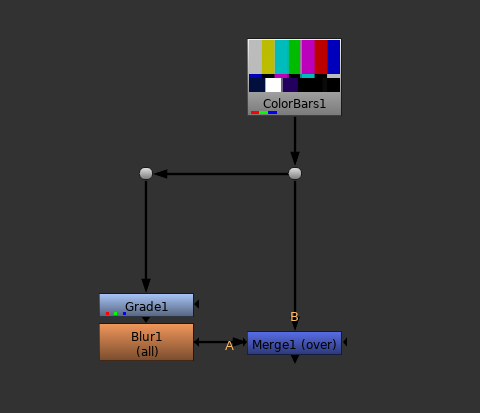
This is the window it pops up showing the code needed to generate those nodes. Copy and paste it into your own code. The order it creates the nodes is important because some nodes may depend on others. It also adds a few handy things to deselect all nodes and collect up the new nodes to select them at the end.
Hope that saves someone, somewhere some time.
August 7, 2017 2 Comments
If you have made Nuke tools that rely heavily on Pyside, the move to PySide2 in Nuke 11 causes a few issues.
However, I’ve found that I can make the change quite easily with a few lines at the top and a bit of Search and Replace. A good guide has already been written on Nukepedia here, including a mention of the Qt.py project, but for my tool Animation Maker, this is how I chose to do it.
My original import of the two main Qt modules was like this:
import PySide.QtCore as QtCore
import PySide.QtGui as QtGui
I’ve now changed it to this:
try:
    # < Nuke 11
    import PySide.QtCore as QtCore
    import PySide.QtGui as QtGui
    import PySide.QtGui as QtGuiWidgets
except:
    # >= Nuke 11
    import PySide2.QtCore as QtCore
    import PySide2.QtGui as QtGui
    import PySide2.QtWidgets as QtGuiWidgets
You’ll notice I’ve imported the same module twice under different names in both cases, and this is key to avoiding peppering your code with if/else statements. The reason you can’t just do a straight swap from PySide to PySide2, is that most of QtGui is now called QtWidgets. And the reason you can’t just import them both as the name QtGui, is because not all of QtGui has moved to QtWidgets! Anything that isn’t actually a widget, like QColor, is still in QtGui.
So I created a joint name of QtGuiWidgets, to contain QtGui in Pyside and QtWidgets in Pyside2. Then kept the QtGui namespace there for both. It’s unnecessary for Pyside, but it just allows my code to refer to either. You can call your combined module whatever you like: QtCombined, QtGui2, QtGW, QtGwidgets…. whatever makes sense.
It then remained for me to do a search for QtGui in my code and replace all of them with QtGuiWidgets. I then ran the code to find any that it failed on, and put those back to QtGui. Once I’d found them all, it worked.
Example:
QtGui.QPushButton()         #old
QtGuiWidgets.QPushButton()  #new
I did find one example where a method name had changed, so I had to do a try/except on that line, but aside from that everything works the same.
Here’s some more examples of methods that need to be moved to the combined module name (probably not a complete list):
QtGuiWidgets.QWidget()
QtGuiWidgets.QLabel()
QtGuiWidgets.QComboBox()
QtGuiWidgets.QGroupBox()
QtGuiWidgets.QRadioButton()
QtGuiWidgets.QMessageBox()
QtGuiWidgets.QLineEdit()
QtGuiWidgets.QGraphicsView()
QtGuiWidgets.QGraphicsScene()
QtGuiWidgets.QGraphicsSimpleTextItem()
QtGuiWidgets.QGraphicsEllipseItem()
QtGuiWidgets.QGraphicsLineItem()
QtGuiWidgets.QGraphicsDropShadowEffect()
And here’s some more examples of methods that still belong to QtGui (also probably not a complete list):
QtGui.QFont()
QtGui.QPainter()
QtGui.QColor()
QtGui.QBrush()
QtGui.QKeyEvent()
QtGui.QPen()
Incidentally that one changed method name I came across was solved with this:
try:
    self.graphic.setAcceptsHoverEvents(False)
except:
    #PySide2
    self.graphic.setAcceptHoverEvents(False)
That’s it. You may find that this approach isn’t suited to your projects, but hope this helps someone out there.
August 6, 2017 2 Comments
Now compatible with Nuke 11 (and everything below).
Also fixed a few bugs that meant multivalue knobs weren’t behaving correctly. If you added a second or third AnimationMaker tab to the same knob on different values, the latter would wipe the other expressions.
Get version 1.3 here, and just copy it over your existing version.
December 10, 2016 3 Comments
The new version of my animation tool for Nuke is now available! Please feel free to download and replace the old one. It’s a simple python script that you drop into your .nuke or plugins folder, then add one line to your menu.py (“import AnimationMaker”).
See the previous version for more information, but here’s what’s new:


Tested on Nuke 10 on Linux and Mac, so if you have any issues on Windows let me know.
February 12, 2014 3 Comments

I made a python script that will take a folder of images and convert them to your format of choice using Nuke in command line mode. It can also iterate through all the subfolders and rebuild the tree in the destination, converting any images it finds. Handy for converting a bunch of dpx files to jpg for a website, or converting a whole tree of CG passes from one format to another. It goes through Nuke so default colourspaces for each format are applied. The script sets jpgs to 100% quality and sets exrs to the format that is most efficient for Nuke. So if your CG passes are in the wrong exr format, you could run them through this to speed up your comp.
Runs in a linux terminal. Look in the .py file for examples of how to call it.
Some users are not keen on typing long commands into the terminal so I have also made a GUI interface which you can run directly from a Nuke menu. Just add the menu item, using the example menu.py line included, and when you run the tool in Nuke it will bring up a friendly dialog asking for the source and destination directories and other options. When you press OK, it loads a terminal and runs the above script using the options you gave. Though I could run it completely invisibly, I chose to run it in a terminal so you could see its progress and estimated time left. So even though you are launching it from within Nuke, it’s running a separate background instance of Nuke to do the converting. You can carry on comping.
In a good pipeline you shouldn’t have to do conversions like this but there’s always some unusual circumstance where a bunch of files need to be converted for one reason or another. A handy tool to have in those situations, or if in a more ad-hoc environment.
October 11, 2013 30 Comments
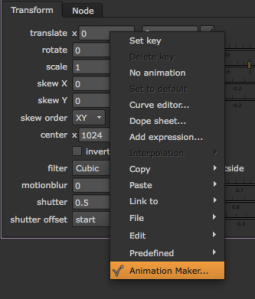
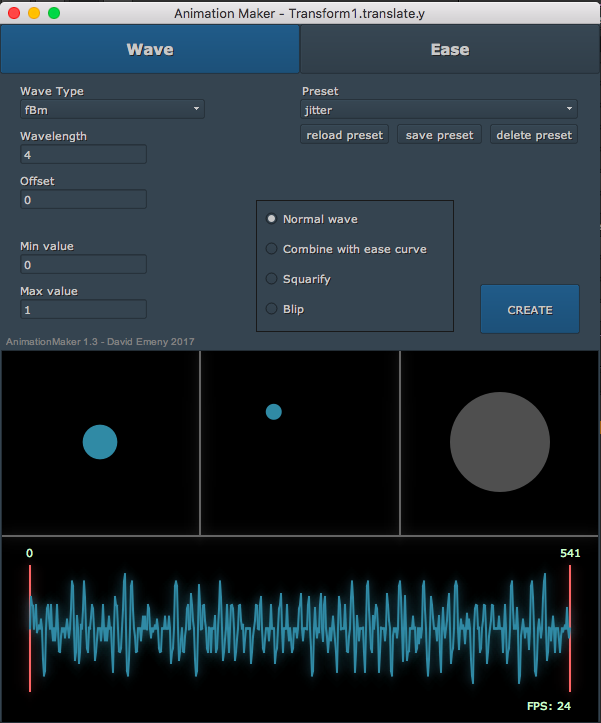
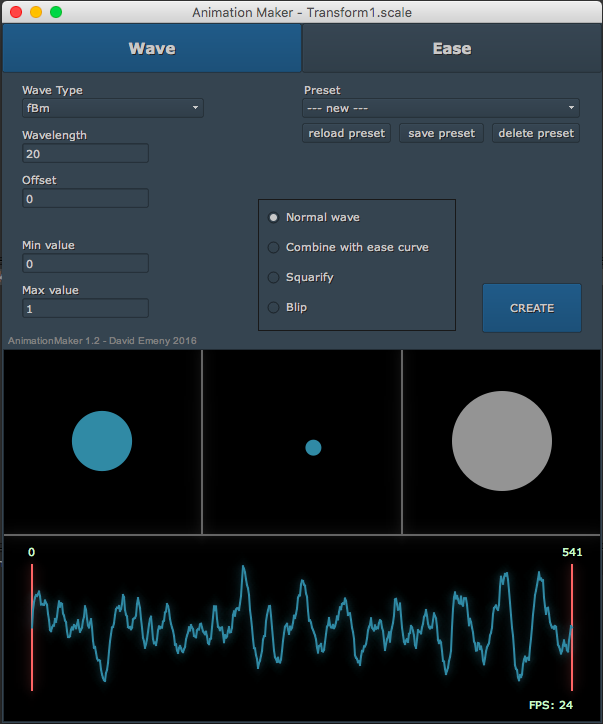
I have made a little extension to Nuke that when right-clicking any animatable value on any node you can choose ‘Animation Maker…‘ from the pop up menu and a whole suite of customisable animation curves can be chosen. When you’re happy, it generates the expression to form that curve and puts it into the knob in question. It also adds a user tab to the node with sliders so you can refine it on the fly. No extra nodes or expression lines in your script and it’s available everywhere.
It does all the maths for you.
Contains ease curves such as Quad, Exponential, Bounce and Elastic. Wave curves such as Sine, Random, Noise, Triangle and Sawtooth. Options to combine a wave with an ease curve, turn a wave into a ‘square’ version or create a sequence of blips at certain intervals.
All contained in one .py file. No gizmos required. Just put the file in your .nuke directory (or wherever your plugins directory is located), then add two lines to your menu.py.
Download here
This supersedes my previous WaveMaker tool, so no need to have both installed.

Pop up dialogue in Ease mode, showing the motion with a growing circle, a moving circle and a circle fading from black to white.

Pop up dialogue in Wave mode showing an example noise wave.

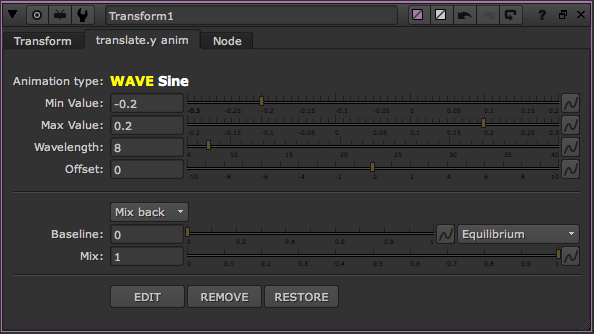
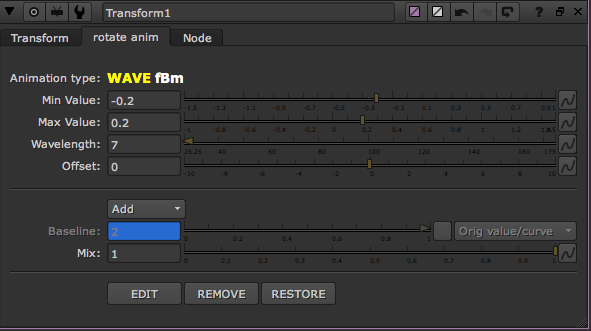
When CREATE is pressed, a new tab like this will appear on the node.

An expression will be put into the chosen knob which is linked to the new tab’s controls.

An example Expo Ease Out curve

An example Expo Ease In curve

An example Expo Ease In & Out curve

An example Bounce curve

An example Elastic curve

An example Noise wave

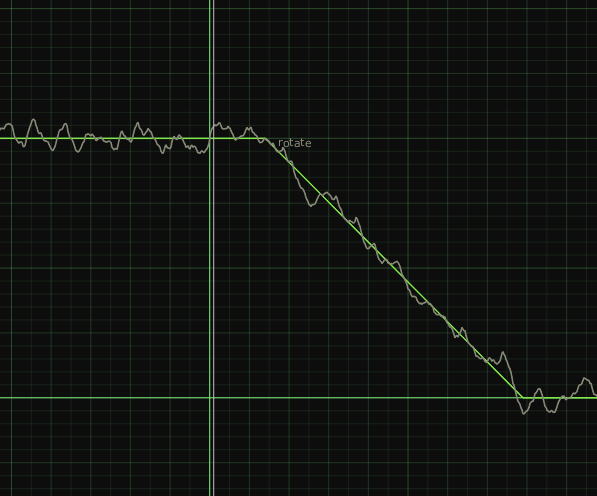
An example Sine wave combined with a Linear ease in.

An example Blip animation made from a Sine wave.
August 4, 2013 3 Comments
I have written a little tool to help turn animation curves into more useable numbers. I’ve called it CurveConverter and it’s just a node that takes an input curve and generates an output curve. Copy any animation into the input, then control other animations in your comp by linking them to the output.

Why is this useful?
Any time you have an animated value in your script that you wish to use to drive other animations, you will most likely have to multiply it by another value to get it into a useable range or scale it by hand in the curve editor. You might have to fiddle a while to get the peak and trough values to be where you want them. With this tool you don’t need to do any maths or manual scaling, just copy the curve across and enter your minimum and maximum values. It will scale the curve so that the highest peak is your maximum value and the lowest trough is your minimum value.

Practical example:
You have a plate with flickering fire light and you need to create a patch or CG character with flickering lighting to match. You might use a CurveTool node to analyze the average intensity of the plate (giving values perhaps between 0.028 and 1.124). Normally you might then link a grade node to that animation curve and work out what value you need to multiply by to get a good result.
Instead, go to a dark frame and adjust your grade node so your patch matches (perhaps using the multiply or gain), copy that value into the ‘New min value’ of a CurveConverter node. Then go to a bright frame, adjust to match then copy the value into the ‘New max value’. The patch should now animate between those two settings.
Alternatively, use a CurveConverter tool to convert that curve into values between 0 and 1. Then connect the result to a Dissolve node to switch between a dark grade setup and a bright grade setup. This way would allow you to do more complex grade adjustments in the two lighting states.
Another application would be matching animation to an audio curve.
July 3, 2013 1 Comment
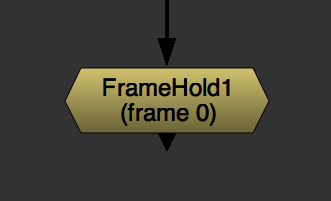
Bearing in mind that 99% of the time when we create a FrameHold node we want to hold the current frame, usually as part of a frozen camera projection. Yet FrameHold defaults to frame 0. Yes, it only takes a second to peer down at the timeline and write in the frame you want, but your time is precious so why put up with that?
You can always write the word ‘frame’ into any value and it will turn into the current frame number, but that’s still 5 key taps that you, a person with your talents, shouldn’t have to be making.
If you have access to your menu.py, simply add this line to make every FrameHold you make automatically use the current frame when it’s created (should be all one line):
nuke.menu(‘Nodes’).addCommand( “Time/FrameHold”, “nuke.createNode(‘FrameHold’)[‘first_frame’].setValue( nuke.frame() )”, icon=’FrameHold.png’)
It’s nothing complicated, just overrides the normal FrameHold menu item, creates a FrameHold in the same way, but uses the nuke.frame() function to grab the current frame number at the time of creation.
June 3, 2013 1 Comment

Just made a python script to help quickly import Mocha tracker data into Nuke 7’s wonderful new tracker. Of course, you can export a Nuke CornerPin from Mocha, but having the four tracks inside a tracker node allows you to create cornerpins, transforms, average tracks, add other tracks etc.
The easy answer is to create a tracker with four tracks and manually copy the animation from the cornerpin or load the four ascii files one by one into each tracker.
If you use Mocha a lot, this can be laborious. So this script asks you to locate one of the four Nuke ASCII files you exported from Mocha, then burps out a tracker node with all the tracks inside. Anything to shave off precious seconds I say.

